Scary October: A bad month for spending

We try to do our best here at Casa del CIQY, but sometimes, things can get away from you. This October was one of those bad months for us and saw a big spike in our household spending.

Maybe you’re thinking to yourself “they must go overboard for Halloween and Thanksgiving” (recall we are Canadian so Thanksgiving is in October for us). Well, we do like Halloween around here and we did host Thanksgiving, but we did pretty well in terms of spending on both of those fronts. What we did have though was a number of irregular expenses that all ended up arriving at around the same time, leading to a month where our net income was very much in the red.

The Expenses

So what were these expenses? Well for starters, our home renovations picked up some serious steam during the month of October, which also accounts for the dearth of blog posts during that month. Our renovations were put on the back burner for a lot of the summer so we could enjoy the weather and each other. Mrs. CIQY and I tend to work opposite shifts, so if we don’t see each other on weekends, we pretty much just don’t see each other. But when the weather started to turn cold we also realized that New Baby was not that far from arriving and we needed to finish our renos before that happened, so we kicked the renovations back into high gear. Consequently, even though we’re doing the work ourselves to save money, there was significant spending on materials during the month.

Next, we had to buy new tires. Eight new tires, to be exact. My wife’s winter tires had worn down their tread far enough that they wouldn’t last another winter, so we needed new winter tires for her car. Meanwhile, I replaced my car over the summer (which I bought used and got a great deal, thankyouverymuch) and I needed winter tires for my car as well. So there was another big expense for the month. Two, if you want to nitpick.

If that wasn’t enough, we bought a new vacuum. I’m not sure when the last time was that you bought a vacuum, but they tend to not come super cheap. And given that we live in a household with three fur babies who shed, this was not an expense we wanted to cheap out on. We have needed a new vacuum for a while and have been on the lookout for a while as well. It just so happened that this was the month when we finally ended up pulling the trigger.

And to round it all out, there was a property tax bill due. Now maybe this doesn’t necessarily count as “irregular expense”, but it’s also not one that is due every month. In our case, taxes are paid in five installments, on five different month-ends. October happens to be one of those months.

The Silver Linings

On the other hand, I don’t view any of these expenses with any regret. They were all justified, they were all arguably necessary, and furthermore each case represents good value (except maybe the property taxes, but there’s really not a whole lot you can do about that one. Taxes gots to get paid).

Let’s start with the renovations. As I have mentioned, we’re doing the work ourselves with a lot of help from my handy dad. So right away, we’re saving a lot of money on labour. My dad and I both estimate that if we had hired contractors to do this work for us, it would have cost us approximately $25,000. So far we’re on budget to have it all done for about $6000-7000.

Furthermore, we’re significantly adding to the value of our house. We’re adding a full bath, turning our formerly 1.5 bath house into a 2.5 bath house. And in refinishing our old rec room, we’re adding insulation where there was none before to the external walls. So we’ll be saving a lot of money in future years in heating costs. And of course, most important of all, finishing these renovations will bring us more enjoyment of our house, we’ll get better use out of our basement space, and we’ll be making our lives easier. Win-win-win. No brainer.

Next, the winter tires. I’m of the opinion that when you live in Canada (at least in our part), winter tires are essential. Especially when I think about the safety of my wife and kids, this is something that is well worth the expense. So I’m definitely not second-guessing the purchase of winter tires in general. That’s a good start.

But beyond their being essential, we also got a good deal on the tires too. My wife got a great deal at Canadian Tire during their “Biggest Tire Sale of the Year” or whatever it’s called. And we had them installed on a set of steel rims that we got for free, along with the old set of winter tires, from my brother after he got a new car and his old winter tires didn’t fit. As for the tires I got for my car, I found them on Kijiji. They are fantastic tires. Top of the line Nokians, from Finland. Normally these things retail for about $200, per tire. I got a set of four, on rims, for $350. And lots of tread left. These babies should last me for a good 3 or 4 winters I’d wager. Not to mention the man I bought them from was very nice, and had even marked them for me, for proper tire rotation. This was definitely an example of good value for a dollar. Kijiji, baby!

Finally the vacuum. Like I said, we have pets. Three of them, to be precise; two cats and a dog. And a toddler, and a baby on the way. Our old vacuum had become unreliable. It was also heavy and had a broken power switch (we had to just plug it in to turn it on and unplug to turn it off). We had gotten several glowing reviews for Dyson vacuums from family and friends, and decided we wanted to get one for our next vacuum. When someone you respect and trust says “it’s the last vacuum you’ll ever buy”, that is the best endorsement you can hear. This was something we already knew we wanted. So when we came across an older model that was marked down at Canadian Tire and came with a $50 rebate, we recognized our window of opportunity and climbed through it.

As for the property tax… well if you know a way to get out of paying that bill, I’d love to hear it. On the other hand, as a good citizen I recognize the value of paying my taxes and I do it willingly. Personally I think there’s some good value in this expense too. As long as my plumbing keeps working, my trash keeps getting picked up, my streets cleaned, my traffic lights stay operational,…

So add it all up and it was an expensive month. There’s no two ways about it. On the other hand, we’re closer to having an extra bathroom and an awesome rec room to play in, we have peace of mind when it comes to driving safely this winter and for the next few winters, and we’ve got an amazing vacuum that should last us a lifetime. So it’s not exactly like we’ve got nothing to show for all that extra money being spent. Sometimes it’s better to focus on what you get, rather than on what you have to give to get it.

The Lost Art of Fixing Things, Vol 1: How to fix a freezer leaking water into the fridge

The key to achieving financial independence is reducing or eliminating any spending that you can practically avoid. Life comes with a lot of expenses that can’t be avoided. We all have to eat, so unless you’re growing or raising all of your own food, you gotta spend money on food. We all have to live someplace, so unless you own your home outright, we all have to spend money on rent or a mortgage. If you have a place to live, you probably want to keep the lights on and the appliances running so unless you have solar panels or wind turbines, we have to spend money on our electricity bill. You get the idea. Some expenses you can’t avoid. But there are a lot of expenses you can avoid.

Sometimes things break. Unless the thing that broke was useless or you decide you can live without it, now you have a situation where an unforeseen expense has arisen. This is what is known by many as “life happening”. So now you have to spend a bunch of money that you weren’t planning on spending to replace or fix your broken thing, right? Well… maybe. Maybe not.

Once upon a time, things were more expensive. And credit was harder to come by. People had to save up to buy things, and those things cost a lot more in relation to one’s salary. So when things broke, replacing them was often not even an option. You had to fix those broken things, or learn to do without them.

Today things are a bit different. A lot of things are so cheap that replacing them is often the more sensible option. My favourite example is printers. When home computers were new, and people generally made less money than today, a printer cost hundreds of dollars. Today you can get a pretty decent printer or all-in-one for about $50. If it breaks, well… Can you mould plastic? Do you have a soldering iron? Do  you have the ability to handle tiny, specialized, electronic components? Do you even know how to fix a circuit board? And if you find someone who can fix it, do you think they’ll charge you less than $50 for their time plus any parts? No, you’ll go out and spend the $50 and get a brand new printer and save yourself some time and hassle. Or you’ll learn to live without a printer.

But there are still a lot of household items or appliances that are expensive enough that you’re not necessarily going to go and just buy a new one when they break. Like a refrigerator, for example. So if your fridge isn’t working properly and you need to fix it, you have two choices: call a repair person, or fix it yourself.

Well it just so happens that after we moved into our new house a couple of years ago, we discovered a problem with our new fridge. Solid ice was forming on the bottom of our freezer, and water was dripping into our fridge, forming little pools on the shelves and generally making a mess.

I consider myself fortunate because I have a dad who is handy. He could build, make and fix all manner of things. And even though as kids we hated it, he insisted on helping whenever possible. His hope was that we might learn a thing or two from the old man. He was right. Us kids gained a lot of knowledge and confidence and the attitude that we too could make or fix things when necessary. Way to go dad! And thank you.

So how do you fix your fridge when you know nothing about fixing fridges? Google! YouTube! I’ll say it yet again: we live in a golden age for access to information. Type your question into your favourite search engine and you’ll get several answers to your question. Then if you like you can go to YouTube and watch a video showing you how it’s done. Or go straight to YouTube if you like. However you like to do your research is up to you. Maybe Google is how you found this page, in which case I’d say my point is well proven. However you got here, I’m going to tell you what I learned and save you a bit of trouble.

The Problem

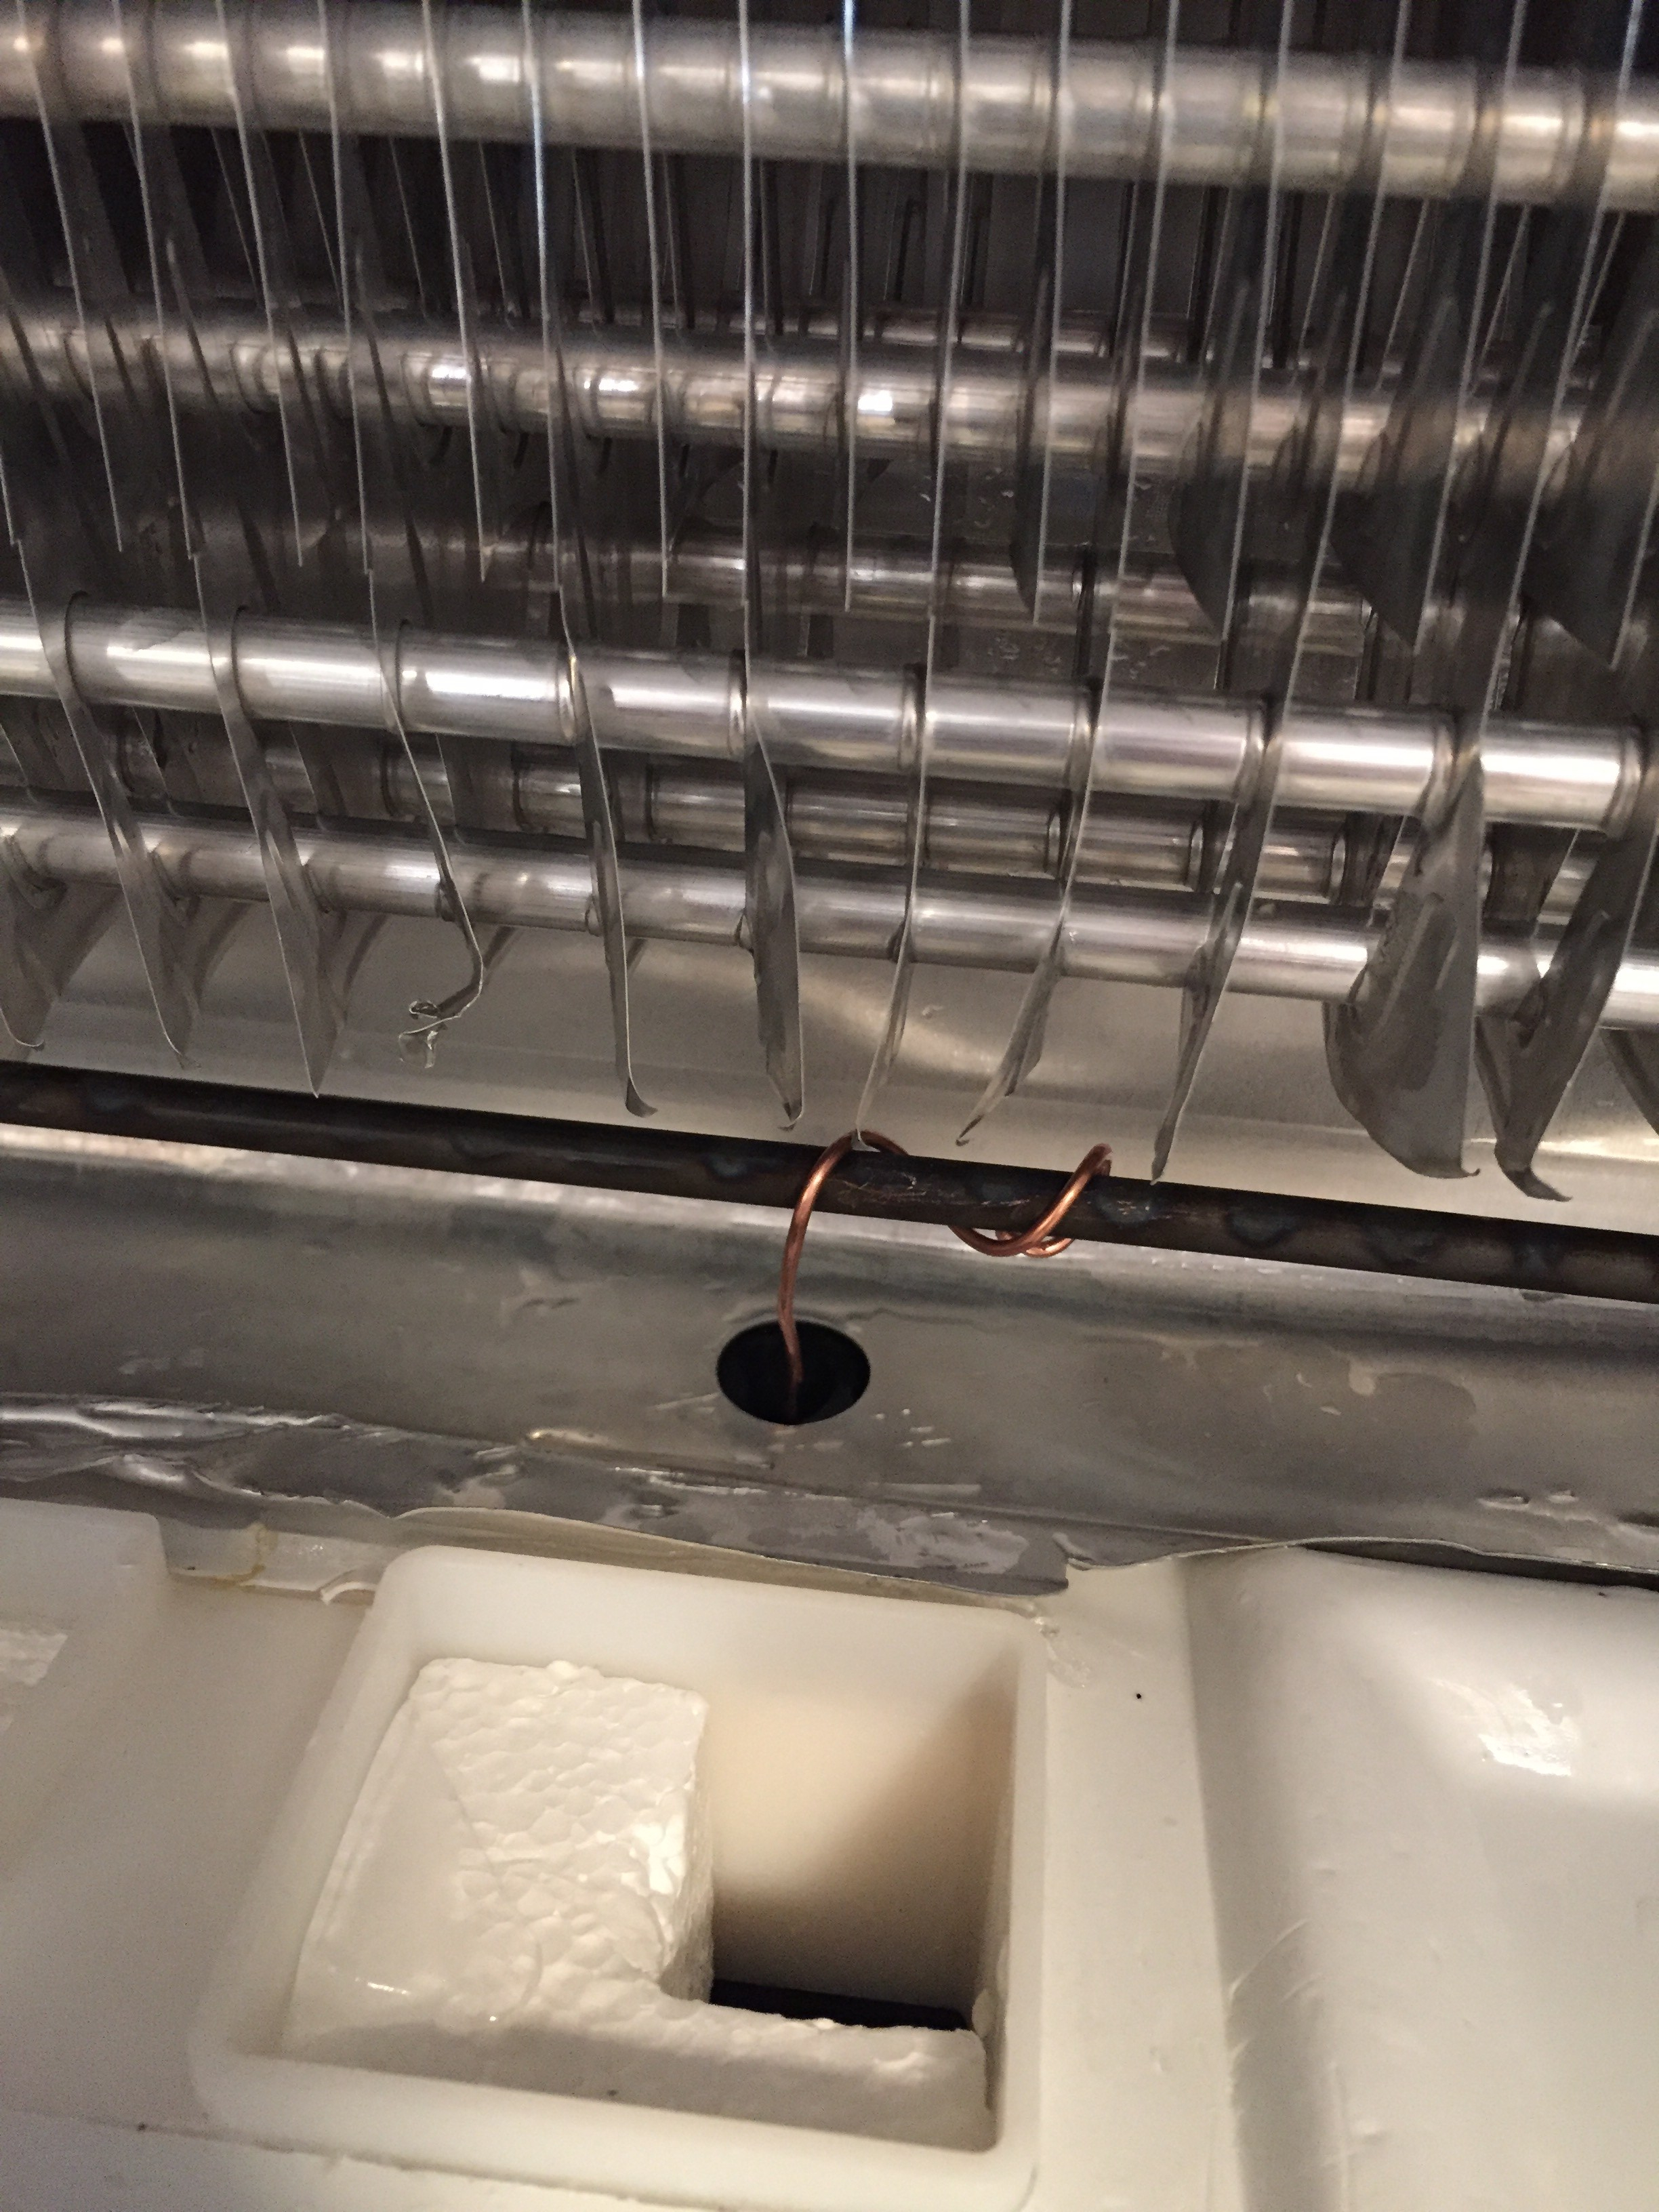
Moisture has a tendency to build up in freezers, which is why another common problem is when frost starts to form on freezer walls or floors. Food tends to have water in it and through sublimation some of that water can escape as vapour. When the vapour is trapped in your freezer, which is cold, it can turn into ice crystals which is how you get the frost buildup. So to combat this, some freezers have defrosting coils in them, to basically turn that ice into water. These freezers will also have a drain in them to allow the water to drain out, thereby removing the problem. Look at the pic at the top of this post and you will see a small round hole. That’s the drain.

Unfortunately, sometimes the water doesn’t make its way into the hole and out the drain properly but instead will pool nearby and freeze. If more water starts to accumulate, you end up with more ice. Eventually you end up with a sheet of ice completely covering your drain hole and now it can’t drain anything at all. Warmer air from the drain line will even cause some of the ice to drip water into the drain line ever so slowly, and then freeze, like the way an icicle forms. And then you have ice in your drain line completely clogging the works. See that other, larger, square hole in the pic, next to the styrofoam? That hole leads below, to the fridge. Warmer air from the fridge below then causes the ice to melt slowly and drip into the fridge, because it can’t drip into the drain hole that is now frozen over.

The Solution

IMG_5338
My great innovation

The goal is therefore to prevent ice from blocking the drain hole. Look at the pic again. See the copper wire wrapped around the dark tube and then leading into the drain hole? That is what it is doing. The dark tube is the defrosting coil. It heats up. The copper wire conducts the heat from that defrosting coil and gets warm enough that any water nearby won’t freeze, thereby keeping the drain hole open and doing what it’s supposed to do, which is drain water, and keep it out of your fridge. Problem solved forever.

Where do you get the copper wire? I happened to have some lying around from some spare electrical wiring. If you don’t, you can go to your local hardware or building supply store and buy some. You might need to strip your wire to expose the copper, but it should only run you a few bucks or so for more than enough wire.

How to fix, step by step:

  1. Unplug your refrigerator. Empty the contents from your freezer and place them in a cooler. They should be fine, since this whole operation should take you only an hour or two. Likewise you’re probably fine leaving the food in your fridge as long as you keep the door shut through all of this. If you’re really nervous about it go ahead and empty your fridge too, but pesonally I wouldn’t worry as long as you don’t leave it unplugged for more than 3 or 4 hours. Just think of it as a brief power outage.
  2. Using the appropriate screwdriver, remove the cover at the back to expose the coils, and any covers on the floor of your freezer that may be covering the drain hole if necessary.
  3. Using a hairdryer, melt the ice on the bottom of your freezer. Alternatively you can break it, scrape it, chip it, or melt it with warm or hot water. Just get rid of all that ice.
  4. To remove the built up ice in the drain line, you will need hot water and a turkey baster (or eye dropper, or syringe, or anthing else you can use to pick up and squirt hot water). Using your turkey baster, pour hot water onto and into the drain hole until it is clear of ice. You will know when it’s clear because at that point you will hear the water pour down the drain line and into the drain pan. Once you hear that, add a few more loads of hot water just to make sure you have cleared the line of all the ice.
  5. Remove all the excess water out of your freezer using towels or sponges or whatever you like. Make sure you get it all nice and dry.
  6. Get at least 6 inches or 15cm of your copper wire. More is fine too, but I wouldn’t use a length any shorter than that. Insert one end a couple of inches into your drain hole. Wrap the other end around the defrosting coil, as seen in the pic above. It doesn’t have to be super tightly wound, as long as you have one or two good points of contact, to conduct the heat.
  7. Replace all covers, plug fridge back into the electrical outlet, put your food back into the freezer and enjoy.
  8. Take all the money you would have spent on a repair person or new fridge and put it in a savings or investment account, to get you closer to your goal of early retirement.